Blue Blockers Compared and How to Make Your Own
Learn why you need blue blockers, who makes the best ones (plus, get discounts) and how to even make your own.

Given the bevy of research showing the harmful effects of artificial light — in particular, violet and blue — it makes sense the companies and entrepreneurs have populated the market with blue-blocking glasses.
If you haven’t read my article on blue light and health, review that first. Otherwise, keep scrolling.
To review: this is the visible spectrum.

Per my article on blue light and health, it’s worthwhile to block artificial violet and blue light at all times. Bare minimum, you should block the 380–450 nm range (violet) during the day and the 380–495 nm range (violet and blue) during the night. If you want maximum melatonin production at night and the best protection of your circadian biology, take it a step further and block green (495–565 nm), too.
You can blue blockers into two types, i.e., daytime glasses (such as BluTech, Gunnar Optiks and BON CHARGE Light Sensitivity) that block portions of the violet and blue light spectrum vs. nighttime glasses (such as Uvex, DEWALT and BON CHARGE Sleep) that block all of the violet and blue spectrum, and either none, some or all portions of the green and yellow spectrum.

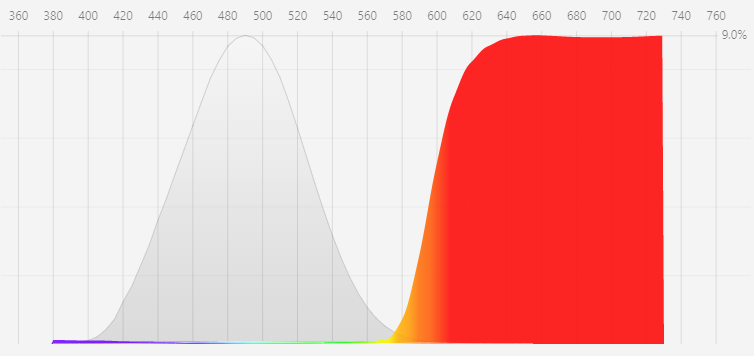
Want to check either blue blockers or blue-blocking software (like Iris or f.lux) to make sure they’re truly blocking blue and green? Look at the boxes below. The one on the left is blue but should appear black with blue-blocking glasses that block up to 550 nm and Iris or f.lux set at 1500K or lower. The one on the right is green. It will appear a darker shade of green with blue-blocking glasses that block up to 550 nm. For it to appear dark gray or black, Iris or f.lux need to be set at 0K or you’d need a tint like BPI Monochrome on your glasses.


Consumer Blue Blocker Buying Guide
Let’s move on to the best daytime and nighttime blue blockers on the market. I took into consideration performance and features, as well as price. In cases where performance and features match, price wins out as this is meant to be a consumer buying guide. Please note that just because a brand is ranked first place does not mean it’s the best fit for you, so make sure to read through my comments.
Where possible, I’ve reached out to companies to get my readers discounts on normal prices via affiliate links and/or promo codes. The goal of this website is not affiliate marketing, but where I can pass on savings to readers, I’m happy to do so.
Best Daytime Blue Blockers
Quick rule of thumb for daytime blue blockers: if you're already blocking a good chunk or the majority of artificial violet and blue light during the day via software like f.lux, Iris, or use screen filters, etc., and getting out in the sun, then you probably don't need a heavily-tinted lens, i.e., lenses with a yellow coating, and can get by with lenses with a clear coating like my last pick – Blokz.
If you're exposed to a lot of artificial light during the day, e.g., you sit in an office under a bank of fluorscent lights, look at a screen without blue-blocking software or filter, etc., then I would make sure to have a more heavy-duty daytime blue blocker with more of a yellow tint, i.e., either of my first two options.
Case in point: when I worked in an office every day and had to attend lots of meetings, I used a custom-made lens with a heavy yellow tint. Once I started working 100% remote, I switched to Blokz by Zenni Optical.
No. 1 Pick: BON CHARGE Light Sensitivity Glasses
These block 100% of violet light and 100% of blue light up to 450 nm. They’re great for daytime use as they block the most retina-damaging portion of violet and blue light, while still allowing a portion of blue to come through for color-sensitive work you may need to do.
Use promo code QUANTUM for 15% off at checkout.
No.2 Pick: Ra Optics Yellow Daylight Lenses
These are identical in spectrum-blocking ability to BON CHARGE’s Light Sensitivity glasses. These used to be my No. 1 pick, but with their recent price increases and BON CHARGE’s competitive pricing, they are now my second pick.
Use promo code JASON for 10% off at checkout.
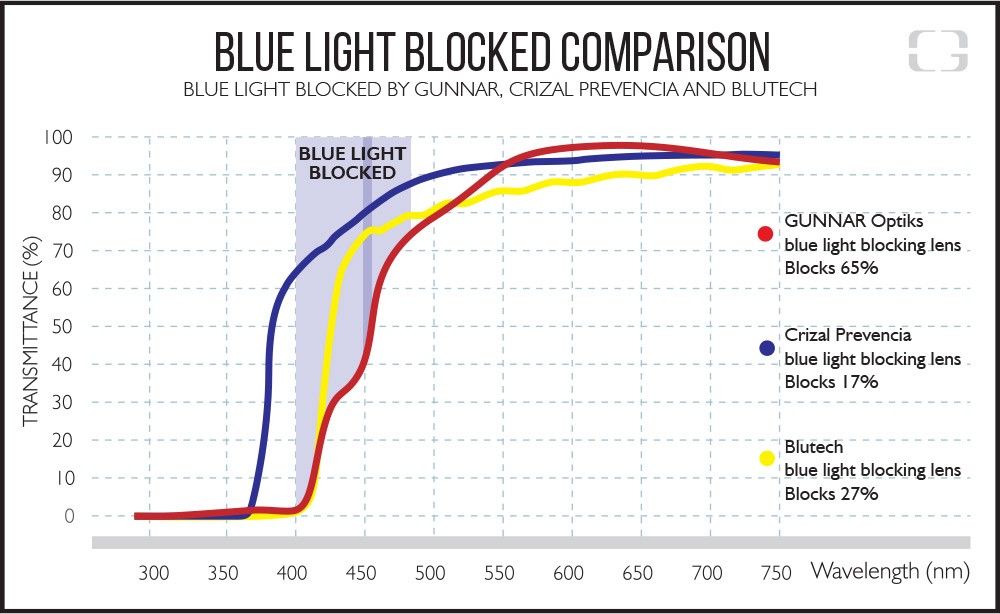
No. 3 Pick: Gunnar Optiks
These don’t effectively block all violet light and they start letting in blue light 50 nm earlier than the BON CHARGE’s Light Sensitivity glasses or Ra Optics' Yellow Daylight lenses, making them not nearly as effective. While their starting price point is competitive with other options, adding a prescription ups the price significantly.
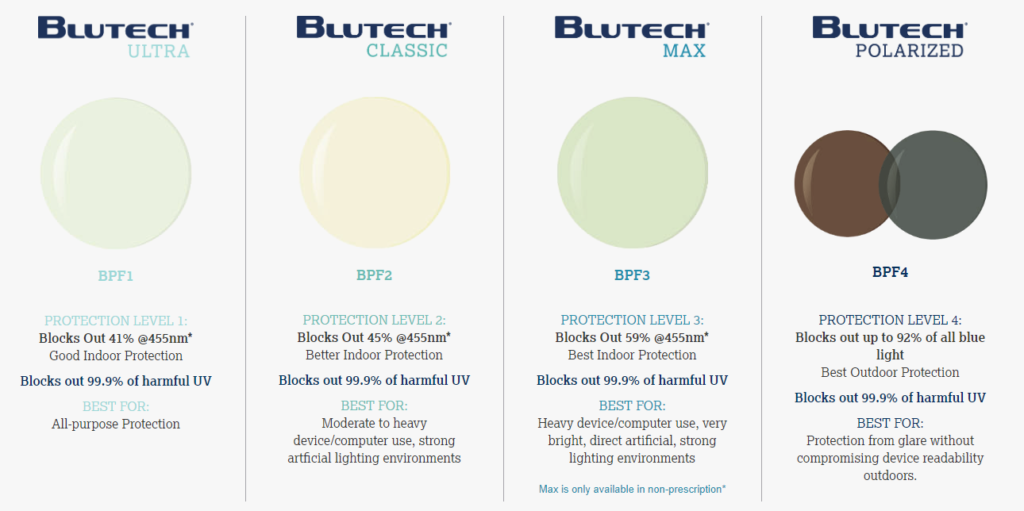
No. 4 Pick: BluTech
BluTech technically has three slightly-yellow-tinted daytime blue blockers (the Ultra, Classic and Max), as well as deep-brown or gray tint (the Polarized). According to their lenses-comparison graphic, the Max will be similar to Gunnar Optiks, but not as good as BON CHARGE’s Light Sensitivity glasses whereas the Polarized would be even better than BON CHARGE’s Light Sensitivity glasses (but it has that very strong deep-brown or gray tint).
Don’t bother with their Ultra or Classics models as they let in too much violet and blue light. BluTechs get pricey fast for two reasons: one, you have to already have a pair of non-plastic glasses to use and then, unless you have great vision insurance, the process of bonding the BluTech tint to your glasses is going to start at $129 and up.
Another Option: Blokz by Zenni Optical or Computer Glasses by BON CHARGE
I'm a big fan of Zenni Optical for cheap, but quality glasses. It's easy to get a pair with a prescription that last for years for less than $50. Their Blokz coating is a fairly tame blue blocker and since they don't have a transmittance chart and blue and violet light hitting them generates a green-ish tint, I would imagine what's blocked is very similar to Crizal Prevencia.
Similar to Blokz, BON CHARGE has offering called Computer Glasses. If you choose BON CHARGE, remember, you can get 15% off at checkout with promo code QUANTUM.
Best Nighttime Blue Blockers
Unlike the caveats for daytime lenses, guidance at night is pretty simple: you want a lense that blocks 100% of violet and blue light, so true transmittance doesn't start until 550 nm – the green part of the spectrum.
No. 1 Pick: BON CHARGE Sleep Glasses
These block 100% of violet and blue light. Green light starts coming in at 550 nm, but as I noted with this chart included in my article on blue light and health, the melatonin-damaging effects of green light are in the 495-550 nm range—those last 15 nanometers are very negligible.
Use promo code QUANTUM for 15% off at checkout.
No. 2 Pick: Carbonshade
Carbonshade is the only major brand that blocks 100% of not only violet and blue light, but green as well. According to most of the literature I’ve read, the 550-565 nm range of green light has a very negligible impact on circadian rhythm, as well as melatonin suppression. Still, the ability to block green completely is a nice bonus, as is the fact the starting price is only $95. The main drawback to the Carbonshade brand is that they don’t support prescription lenses.
Use promo code JASON for 20% off at checkout.
No. 3 Pick: Ra Optics Red Sunset Lenses
These are identical in spectrum-blocking ability to BON CHARGE's Sleep Glasses. At one point, Ra Optics did a tint called Monochrome that blocked 100% of violet, blue, green and yellow light. However, the company stopped offering that tint – probably due to lack of demand.
Use promo code JASON for 10% off at checkout
No. 4 Pick: DEWALT DW0714
Seriously, what a value. These average about $20 or less through various retailers and block all violet and blue light. They almost block all green as well, too. They have two drawbacks, though: the contrast on them is very poor and if you wear glasses, you have to place your glasses over these, which can be slightly awkward.
Why Make Your Own Blue Blockers?
Above, we covered many ready-to-buy options. However, they suffer from problems, such as
- Some don’t allow you to use your glasses prescription, so you either have to lay glasses on top or under these kinds of blue blockers. This has gotten better in the last few years as more competitors have entered the market.
- Some manufacturers don’t publish their spectrum chart, leaving you to rely on online reviews and test yourself.
- They don’t allow you to customize your frames style, leaving you stuck with whatever design the manufacturer provides.
- They don’t account for use case, i.e., you might want a custom tint for a particular situation or time of day.
- Cost. You can easily spend $200+ on a single pair of Crizal Prevencias that don’t block 100% violet or blue light, or you can spend less than $150 to buy all the equipment below to make multiple pairs of more effective blue blockers for yourself, friends and family members.
It’s a cost-benefit analysis, i.e., you can definitely get a pair of effective blue blockers based on the top picks I featured above and will obviously be saving time and labor. However, if you’re a DIY-er or think you’ll be making multiple pairs of blue blockers that require prescription lenses, then you’ll save more money with the DIY method below.
What You Need
Cost will vary depending on what supplies you have and what grade of equipment you buy. You can calculate based on the prices I list below.
- Electric burner (under $20)
- Glasses with CR-39 plastic lenses with no-to-minimal coatings, e.g., UV blocking and nothing else ($6.95 and up at Zenni Optical)
- Lens holder (under $30)
- Empty container, e.g., paint can(s) (under $10)
- Gram analog or digital scale (under $15)
- Preferred BPI tint(s) ($29.95/tint and up)
- A stirrer (a spoon or kebab stick will do)
- A small bowl filled with cool tap water
- Tissues
- Analog or infrared thermometer (under $20)
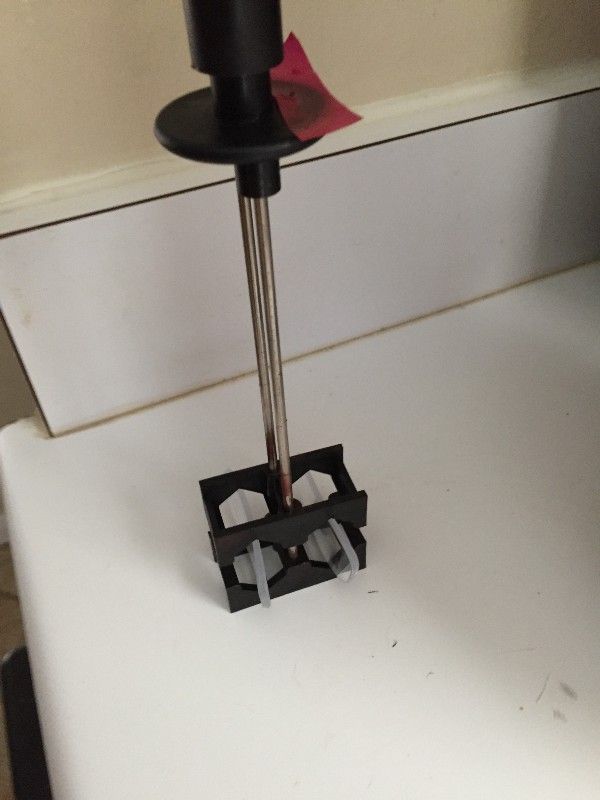
Getting the Lenses Ready
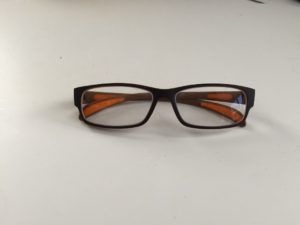
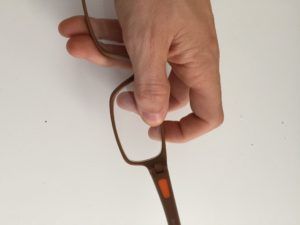
The first thing we have to do is get those lenses out of the frames. I like working with full-rim frames as it makes this easy. All you have to do is apply some pressure with your thumb and the lens will pop out. You have to use a little force but don’t worry — CR-39 is very tough plastic. Let’s start with the right lens.
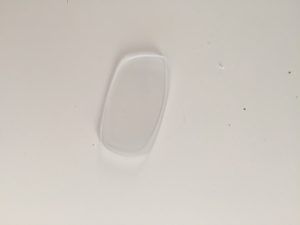
Before repeating this process with the left lens, make sure you are aware of where you’re setting the right lens as you don’t want to get the two lens mixed up if each has its own sphere, cylinder and axis values.
Now pop the left lens out.
If you’re working with lenses with different values, place something like a piece of tape on the right side of the lens holder to indicate the right lens. After that, place the lenses in the lens holder and push down to clamp them into place. Tip the lens holder to the side to make sure they’re snug and won’t fall out.
Prepping the Tint Solution
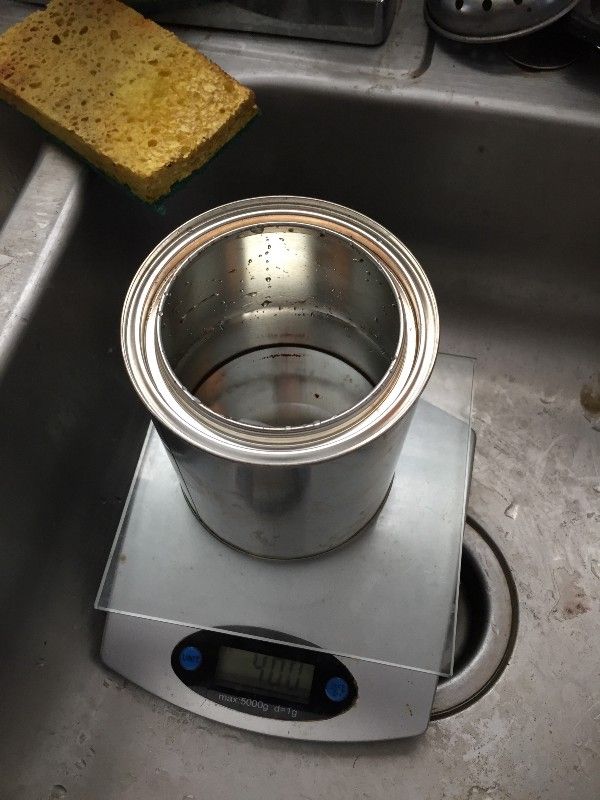
Weneed to figure out how much tint to use. Place your empty container (in my case, a paint can) on your scale and drop the lens holder into the container. Make a visual note of how far from the base of the container you have to go vertically until you reach the top of your lenses.
Once you’ve done that, take the lens holder out of the container and fill the container with tap water so that it goes about 25% higher than your visual note. Will the water is pouring, make a final note of the weight (I used 400 grams).
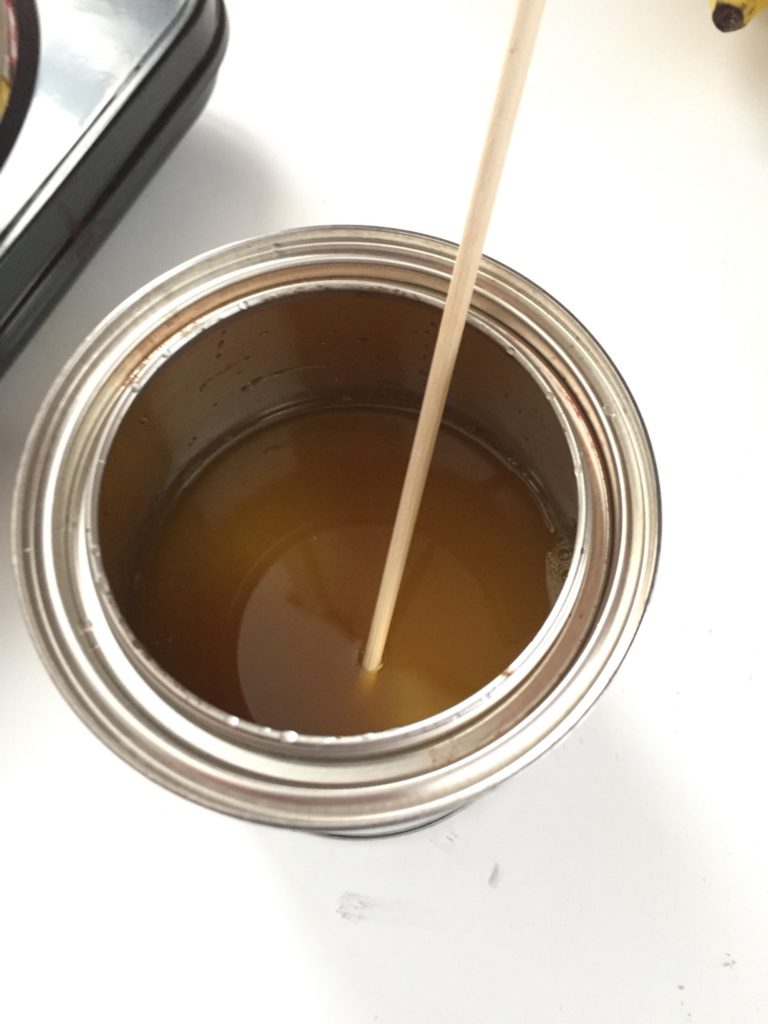
Once you have your water in the container and made a note of the weight, it’s time to add the tinting solution. We want to dilute the tint by 10, to give a 10:1 water-to-tint ratio. Since I had 400 grams of water, I poured in 40 grams of tinting solution. After you pour the tint, give it a stir so the water and tint are mixed together.
Let’s Cook
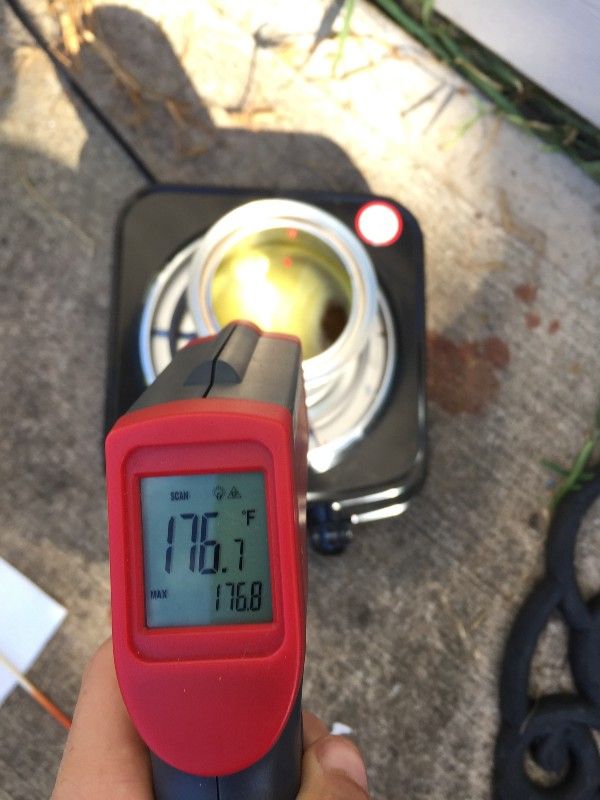
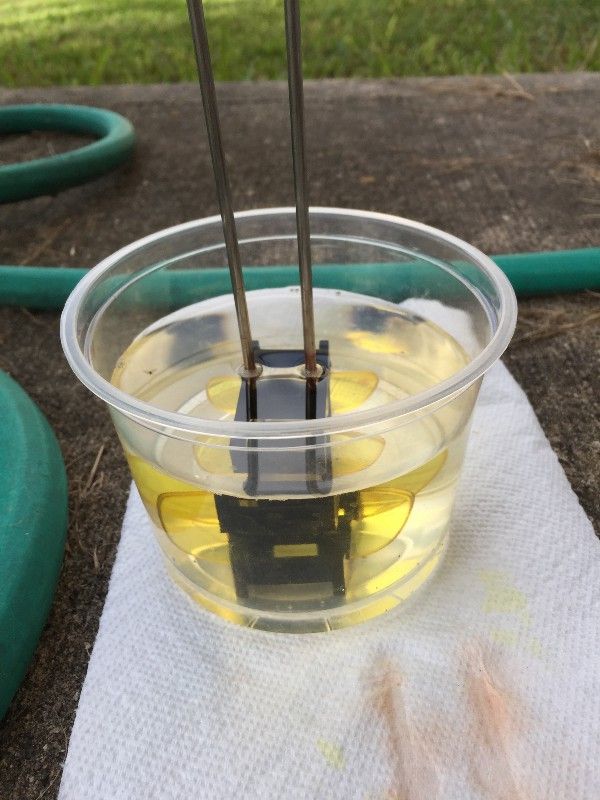
Lens ready. Tint solution ready. Time to turn up the heat. Make sure you do the do the next part in a well-ventilated area or outside.
Place your container of tinting solution on your electric burner. Crank the heat to max. Step away a couple of minutes and come back. Check the solution temperature with a thermometer. Once you get to 175°F or more, lower the burner heat to medium-high (4 to 3 on my burner).
Give the solution a stir and submerge your lens holder. Start your timer and set it for the appropriate time per the instructions on the tint bottle (45 minutes is needed for UV-Blue 450/Winter Sun). While the lenses are cooking, fill a bowl or container with cool tap water (it needs to be deep enough to completely submerge the lenses).
While BPI claims you need to stir the solution often, you really don’t. Unless you get a rolling boil, you can simply stir it once or twice.
Be sure to check how your lens are doing every 10 minutes or so. If you notice that your lenses are starting to get exposed because too much of the solution has evaporated, pour in some more water and a tiny amount of tint and give it a stir. It’s OK to eyeball this. If you end up doing this, add an additional minute or two to your cook time to compensate for the dip in what was a consistent temperature.
Important note: This is why I said at the beginning to pour more water than you think you’ll need as it evaporates during the cooking process. However, I wanted to have the tip above in case you come out to check on your lenses and go, “What do I do?”
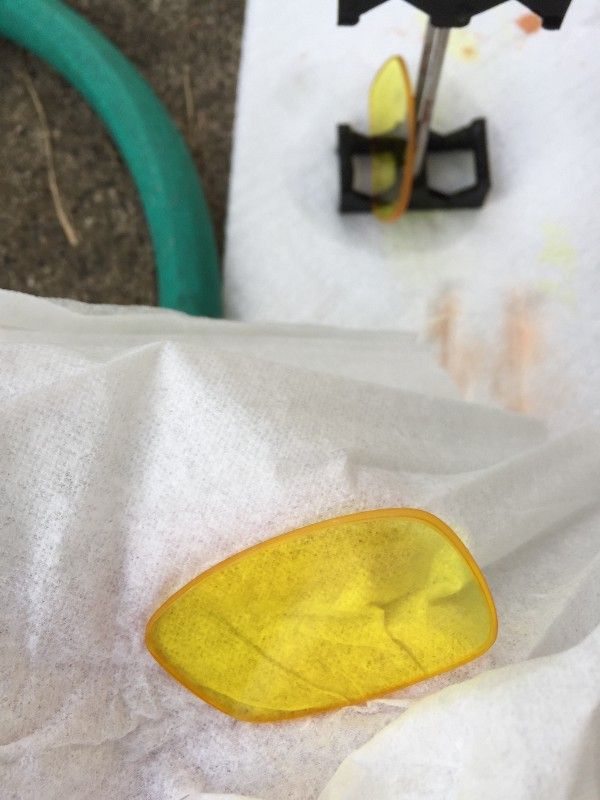
Cooling, Cleaning and Assembling
Almost done. Once you’re timer rings, turn off the burner, take the lens holder out of the container and immediately submerge the lens holder in your bowl or container of cool water.
How long do the lenses need to completely cool and finish setting the tint? Honestly, I’m not sure. My guess is probably only five minutes, but it’s better to err on the side of caution and let them sit in the cool water for 30 minutes.
Once the lenses are cool, take them out of the solution. You may notice a blotchy, non-consistent look before cleaning with deeper tints like Diamond Dye 500/550— that’s normal. Dry and clean them by rubbing them with a tissue, making sure to keep track of which is the left and which is the right.
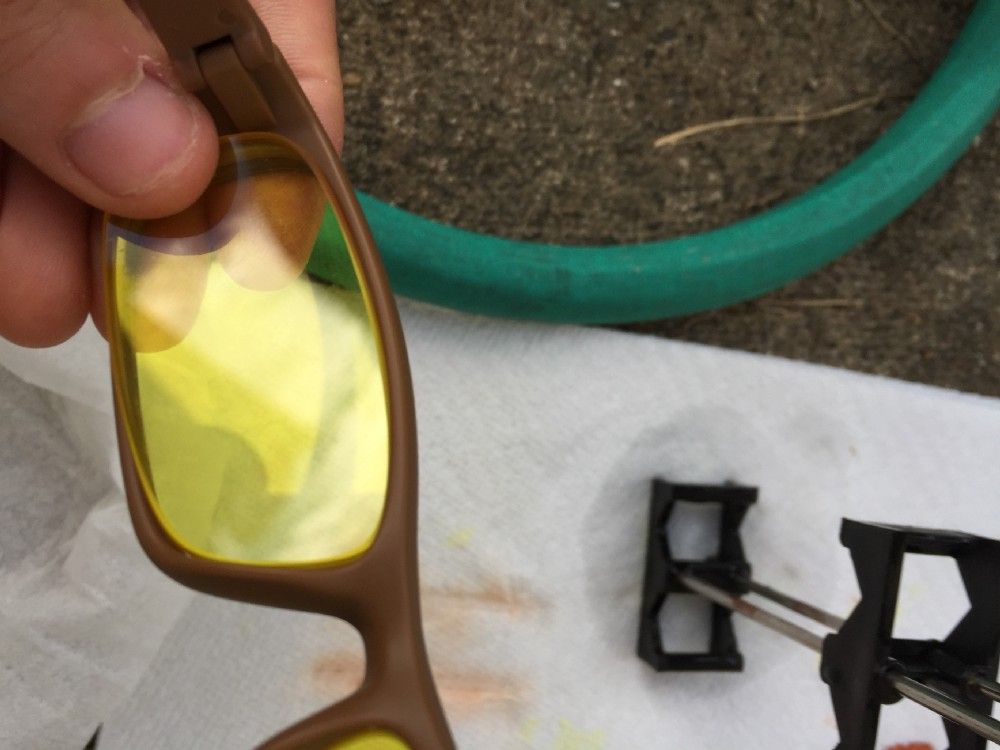
Last step: push the appropriate lens into the correct side of the frame. You’ll have to use even more force than you did to pop them out. Once the lenses are snug in the frames, you’re done!
Frequently Asked Questions
Q: How did you come up with this tinting process?
A: A Facebook friend, JJ Yeo, tested out the BPI Diamond Dye 500/550 tint and shared his results with me and others. I tweaked his process and used different supplies. I tested this out on three sets of glasses with three tints to make sure it could be duplicated consistently before writing this article.
: I got my box of supplies from BPI. I noticed they call for a lot more steps and supplies. Did you leave out steps?
A: Yes, my instructions do not match BPI’s 100%. BPI normally sells to opticians that tint large quantities of glasses in big vats. You’ll only be making a pair of glasses or two at a time, so my guide will work for you. My guess is BPI wants to sell additional products. There’s no need to use their lens prep product as having new, clean, plastic lenses means they’re already “prepped.” BPI does not talk about diluting their dyes, but I’ve tested out three pairs of glasses and can assure you, a 10:1 water-to-tint ratio is fine. If you didn’t do that, you’d be going through a bottle of tint per pair of glasses.
Q: Do I have to use CR-39 plastic lenses? Can I use polycarbonate lenses?
A: You don’t have to use CR-39 plastic lenses, but they’re the cheapest and absorb tints most effectively. I’ve never tested polycarbonate lenses, but have been told by opticians that they don’t absorb tints very effectively (plus, they will cost more than CR-39s). Rule of thumb: Get the cheapest plastic lens you can.
Q: Do lens coatings really matter?
A: Yes. The more coatings you put on a lens, the less tint the lens will absorb. Most companies (like Zenni Optical) put a UV-blocking coating on all lenses by default. That’s OK. All three pairs I’ve made have had that and it didn’t throw off the tinting process.
Q: But I really want anti-reflective coating. I can use that, right?
A: Sorry, but any additional coating (other than standard, UV-blocking coating) has to the potential to cause BPI tints not to adhere. A reader let me know they tried to make a pair of BPI-tinted glasses using lenses with anti-reflective (AR) coating and the BPI tint didn’t adhere. So, it bears repeating: get no additional coatings on your lenses.
Q: Did you cover all tints BPI offers?
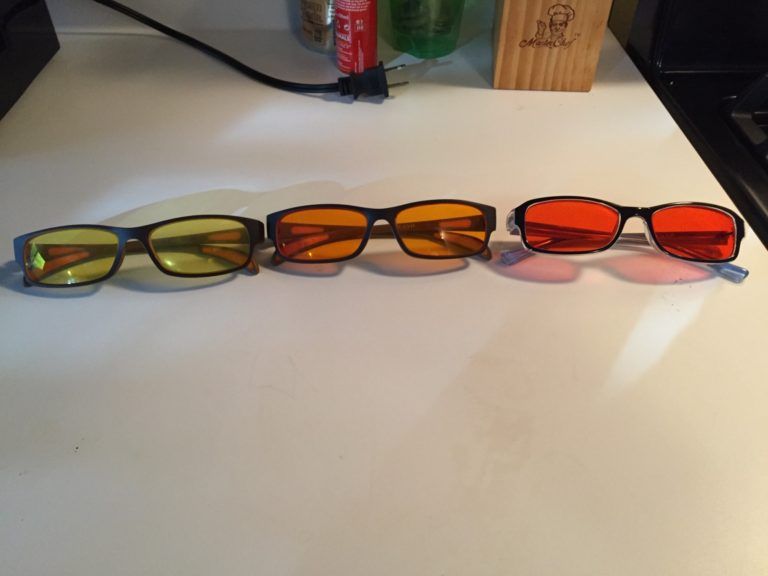
A: No. I was more concerned with blocking violet, blue and green light and which tints had the best daytime and nighttime applications. The BPI website lists all the tints available and this PDF goes over some of their more popular tints and includes spectrum charts. From my own experiment and talking to others that have used BPI tints (this includes optometrists, doctors and bio-hackers), I believe I narrowed the BPI tints down to the most effective ones, i.e., Winter Sun/UV-Blue 450, Diamond Dye 550 and Monochrome.
Q: I have plenty of tinting solution left in the can. Do I have to clean it out right away or can I reuse it?
A: Yes, you can reuse it. This makes total sense if you’re using the same tint over and over again on different pairs of glasses. I’ve left the tinting solution in the can for several weeks, reheated it and made another set of glasses in the same tint. Just make sure you have enough solution to submerge the lenses completely and account for what will evaporate during the cooking process.
Q: If a tint or lens only absorb a certain percent of, say, the blue spectrum, is that still affecting my circadian rhythm and RPE cells?
A: Yes. Unless something is blocking 100% of a particular nanometer (nm) range, light from that spectrum is still hitting your retina, so it will have an effect. Now, the effect will be lessened if only 30% is getting through versus, say, 100%, but there will still be an effect, whether it be phase shifting/re-tuning and/or destruction of RPE cells.
Q: What is your personal protocol for blocking blue light?
A: I use this red tinting trick on my iPhone to eliminate both blue and green light at night. I also use Apple's built-in iPhone feature called Night Shift at all times during the day.
During the workday I use f.lux (settings vary based on work I'm doing) and wear Zenni glasses with the Blokz coating. I make sure to get outside in the sun as often as I can and take off my glasses so natural, full-spectrum sunlight is hitting my retina.
At night, I use amber, red bulbs and/or candles in my house. If I’m out with friends after dark (or early morning) and exposed to artificial light, I wear BON CHARGE's Sleep Glasses.
If I’m up at night using my computer, I make sure f.lux or Iris, so green light is being blocked, too. If I’m watching TV, I use the Drift TV box to eliminate blue light.
It boils down to this: I follow natural light and dark cycles. That means maximizing natural sunlight exposure during the day (as best I can I have to work during the day) while minimizing violet and blue light exposure, and keeping things as dark as I can at night, letting only the yellow, orange and/or red spectrum in if I have light sources.
Q: You mentioned that the retina has the highest concentration of DHA and talked about how important DHA is. Does that mean I can simply take a lot of fish oil pills and not worry too much about blocking violet and blue light?
A: DHA delivered via seafood is much more bioavailable than pills. And if you block violet and blue light from damaging your retina, it’s preserved in your body and you don’t need to continually top it off.
What’s more work for your body? Preserving what it does have and not bombarding it with damage or letting the damage take place and then trying to fix it? The answer should be self evident.